How to host your static site on Amazon S3 and CloudFront
This article explains how to setup Amazom S3, CloudFront and IAM to host a static website. I made this article because I recently published Poltergeist, yet another static site generator, which uses Amazon for deployment.
Before even diving in, you have to know that to host your site on S3 the way I present it, you need to also manage your DNS with Amazon Route53. If that’s not an option for you, this article might still help you but some of the steps won’t apply; You will need a server for routing purposes; and that's exactly what I'm trying to avoid.
Another important note is that this is not a free; S3, Route53 and CloudFront all have costs based on usage. You bill will likely be very low (couple bucks a month) and it is fine by me for the performance boost we get. It is a small contribution to making the web fast.
This post is split in 4 parts, the last 3 being optional but highly recommended:
- Create a S3 bucket and point your DNS to it
- Create a CloudFront distribution and point your DNS to it (optional)
- Create a limited user access with IAM (optional)
- Redirect www to our main site (optional)
Create a S3 bucket and point your DNS to it
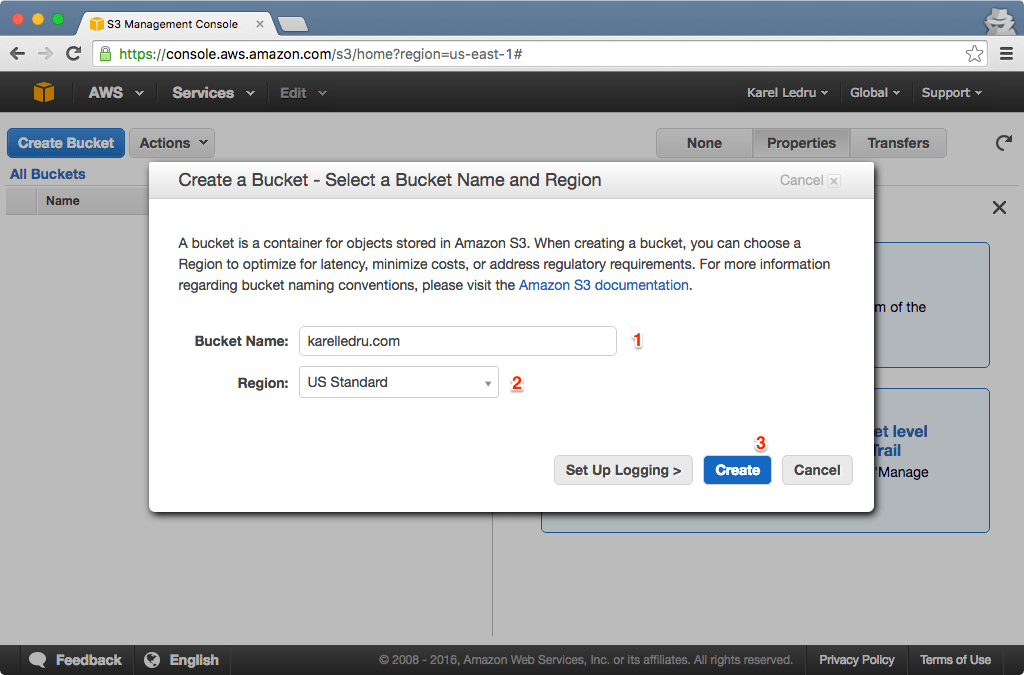
Create a S3 bucket
Set the name of the bucket to your domain. I will use that site as an example throughout the post: karelledru.com . The region doesn’t matter much if you configure CloudFront as a CDN but otherwise you might want to pick the one that is the closest geographically to your audience. If you plan on configuring CloudFront, pick the one that is the closest geographically to make uploading "faster". Once you have selected a region, you will want to know what’s its code is to deploy your Poltergeist site. You can find this information here. For instance, I selected US Standard so the code is us-east-1 .
Enable Static Website Hosting
Once the bucket is created, you can enable Static Website Hosting. You want to click the "Properties" tab and enter the following configuration under the "Static Website Hosting" section:
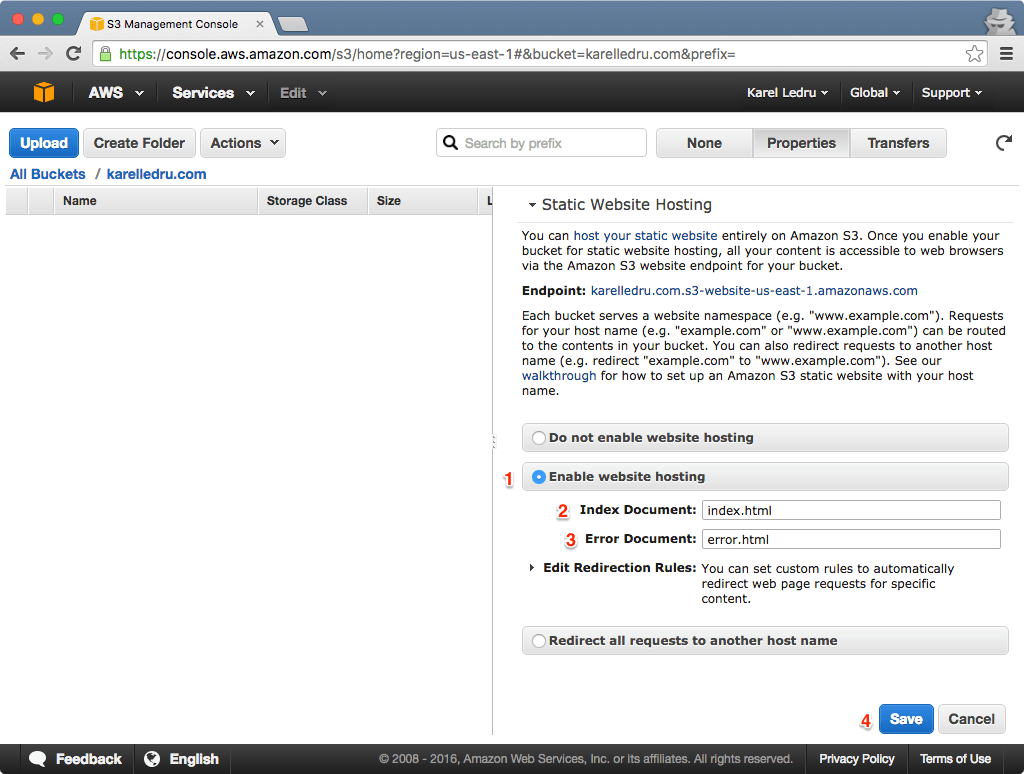
Keep the "Endpoint" too, we will need it later. For me it is karelledru.com.s3-website-us-east-1.amazonaws.com in the above screenshot.
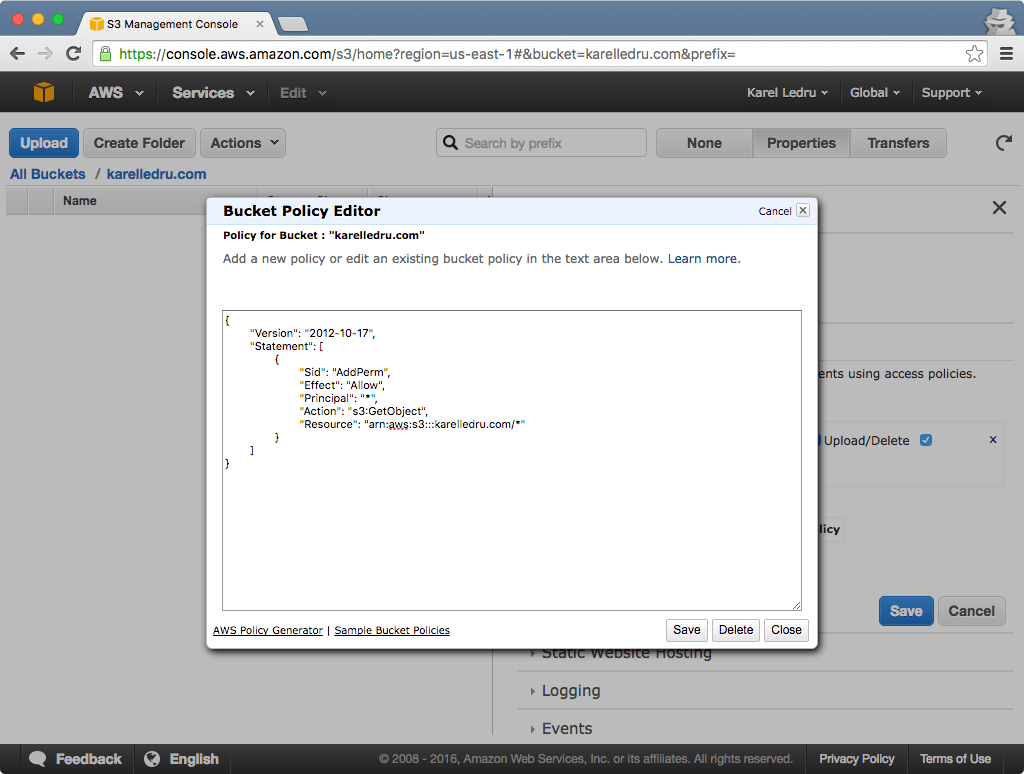
By default, S3 bucket don’t allow public access, which is a good thing. To serve our site, we will want to add a policy to tell S3 it is ok to serve our site publicly. Under the "Properties" tab and "Permissions" section, click the "Edit bucket policy". In the modal that opens, enter the following (replacing karelledru.com with the name of your S3 bucket):
{
"Version": "2012-10-17",
"Statement": [
{
  "Sid": "AddPerm",
  "Effect": "Allow",
  "Principal": "*",
  "Action": "s3:GetObject",
  "Resource": "arn:aws:s3:::karelledru.com/*"
}
]
}
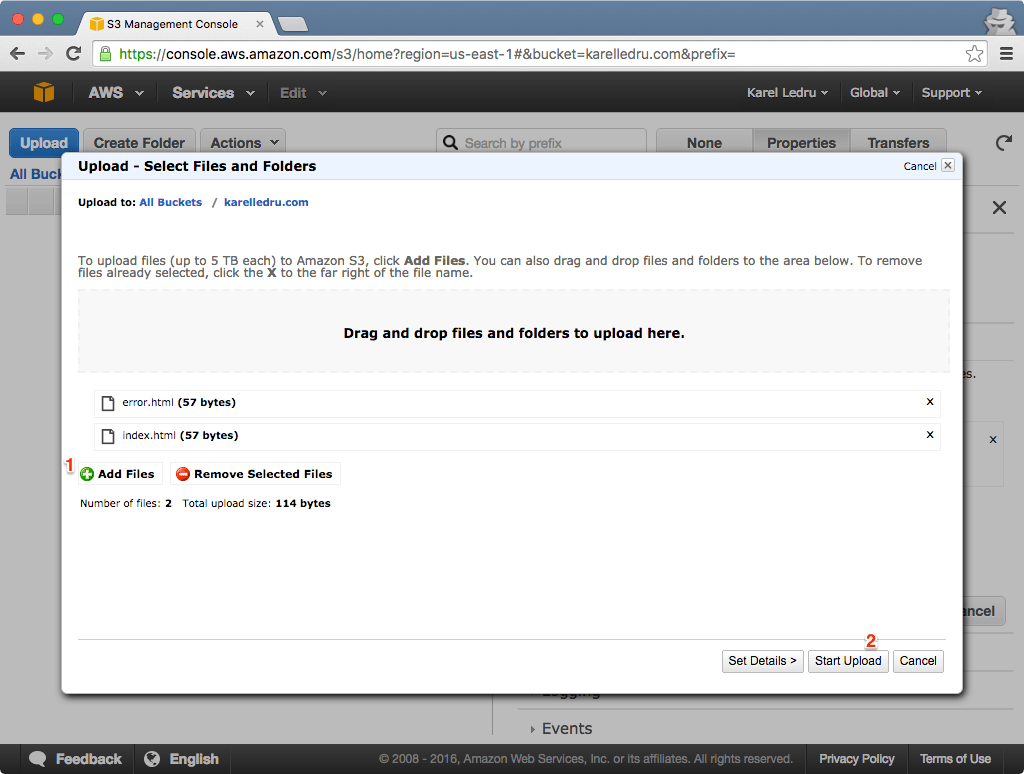
Add an index and error pages
Let’s add two very simple files to our bucket, an index.html and error.html. They are just to make sure everything works ok so something as simple as that will do:
<!DOCTYPE html>
<html>
<body>Index page</body>
</html>
...and for the error page:
<!DOCTYPE html>
<html>
<body>Error page</body>
</html>
Once you have those two files created locally, upload them to your bucket:
Use Route53 for DNS
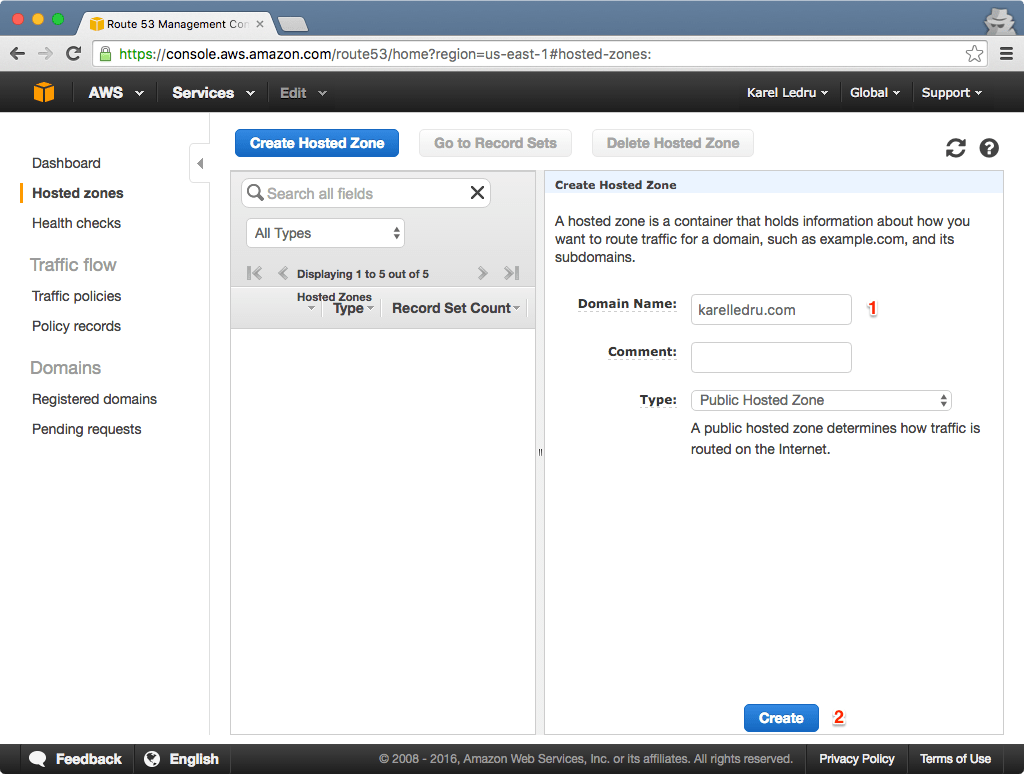
Let's go to Route53 now and "Create a Hosted Zone" for our Domaine Name karelledru.com:
It will give you some NS record that you can setup with your registrar. This is required to move forward but out of the scope of this post as it is a different process for every registrar. The NS records look something like that (these are fake, don't use them):
ns-83.awsdns-35.net.
ns-124.awsdns-41.org.
ns-1656.awsdns-40.co.uk.
ns-402.awsdns-65.com.
Point your DNS to your S3 bucket
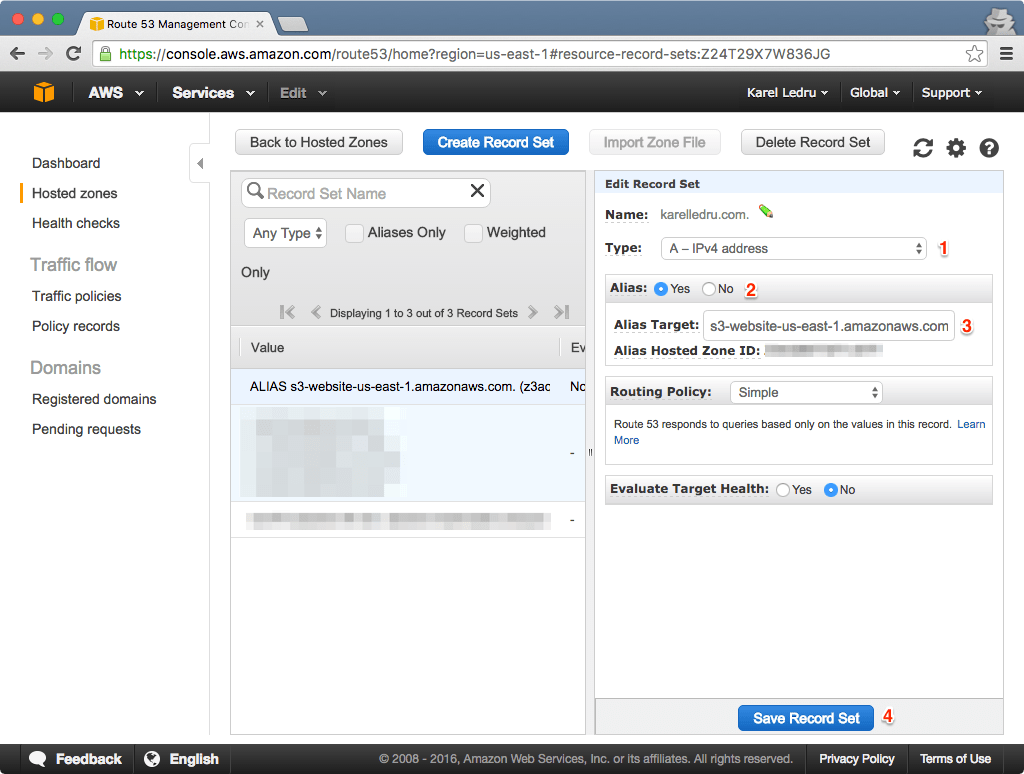
Inside your newly create hosted zone, click on “Create Record Set” and choose a A record (should be the default type). Then set Alias to Yes and select the S3 bucket you created from the "Alias Target" select (for me it is karelledru.com):
You will have to wait a little bit (couple minutes to hours) for DNS to propagate but eventually, when visiting your site, you should see the index page we created above. If you go to a page that does not exist, you should see the error page.
Create a CloudFront distribution and point your DNS to it
S3 is fine, but CloudFront is better. With a CDN, you ensure your site will serve fast wherever in the world. It costs money but so little that I believe it is worth it.
Create a distribution
Go to CloudFront, click “Create Distribution” and select the Web option. Do NOT select your S3 bucket endpoint from the select but enter the S3 Endpoint you got above. If you use the default S3 Origin, index documents won't work. It means that if you visit karelledru.com/folder/, it won't load the karelledru.com/folder/index.html in the folder. If you want to support index document, the Origin should look like karelledru.com.s3-website-us-east-1.amazonaws.com and not karelledru.com.s3.amazonaws.com and you must set the Origin Protocol Policy to HTTP Only because S3 website endpoints don't support HTTPS:

If you don't care for index documents, you can use the default endpoint given the select and you can set the Origin Protocol Policy to either HTTPS Only or Match Viewer since non-website S3 buckets support HTTPS.
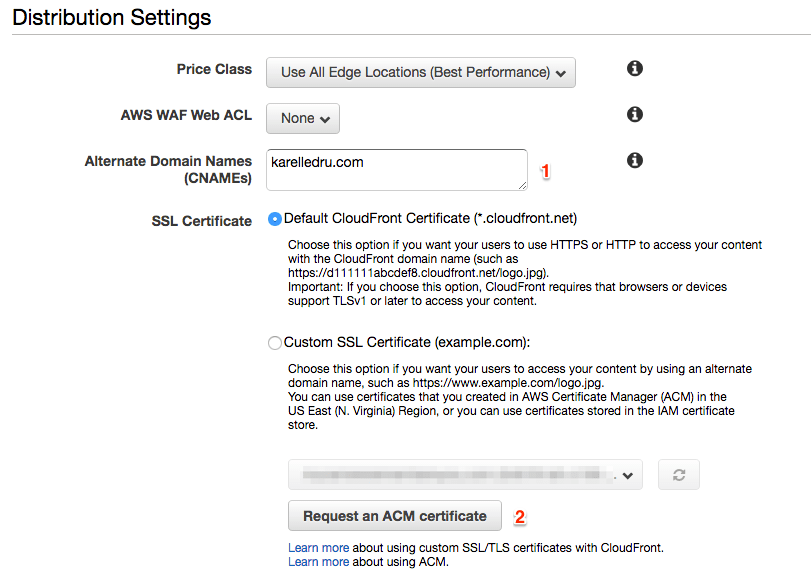
Next, you will also want to set the Alternate Domain Names like below. This will allow the distribution to be available in Route53 to point our A records to it (we will get to that shortly). I usually leave all the rest as it is, but feel free to configure it if you have specific needs. We will setup SSL in just a moment.
At this point your distribution is created but it will take couple minutes to be ready. A CloudFront distribution is basically an endpoint you can use to replace the S3 one. For instance, in my case instead of serving my assets from karelledru.com.s3.amazonaws.com, I serve them from d1woengdksl42j.cloudfront.net. That's the url you want to use for the PRODUCTION_ASSET_URL in Poltergeist. You will also need the CloudFront distribution ID.
Update your DNS to CloudFront
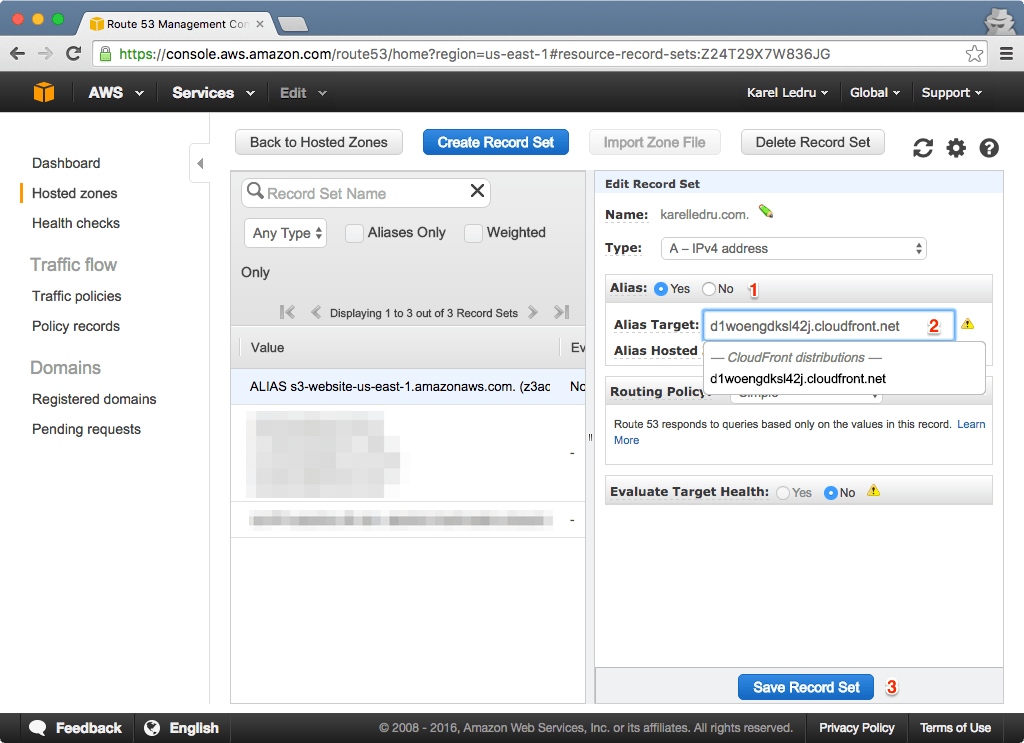
Above we set the DNS to point to the S3 bucket, now we want to update the A record to point to the CloudFront distribution we just created. I couldn't edit the target directly, but after setting the "Alias" radio to No and then back to Yes, I could change the Target:
Enable SSH (optional)
The same way I believe we should make the web fast, we should make the web anonymous and safe. I try to always enable SSL on my sites. Good news, CloudFront makes that very easy.
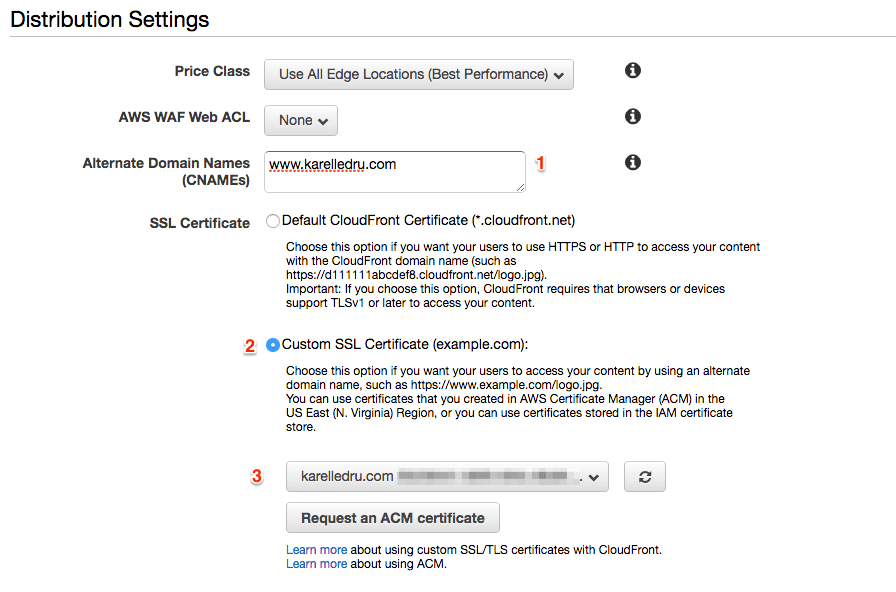
Before we even get started, you must make sure you have access to your domain emails because Amazon will send you confirmation emails. Right now, you shouldn't be able to access your site via https, so let's go to the Distribution Settings to "Request an ACM certificate" under the SSL Certificate section:
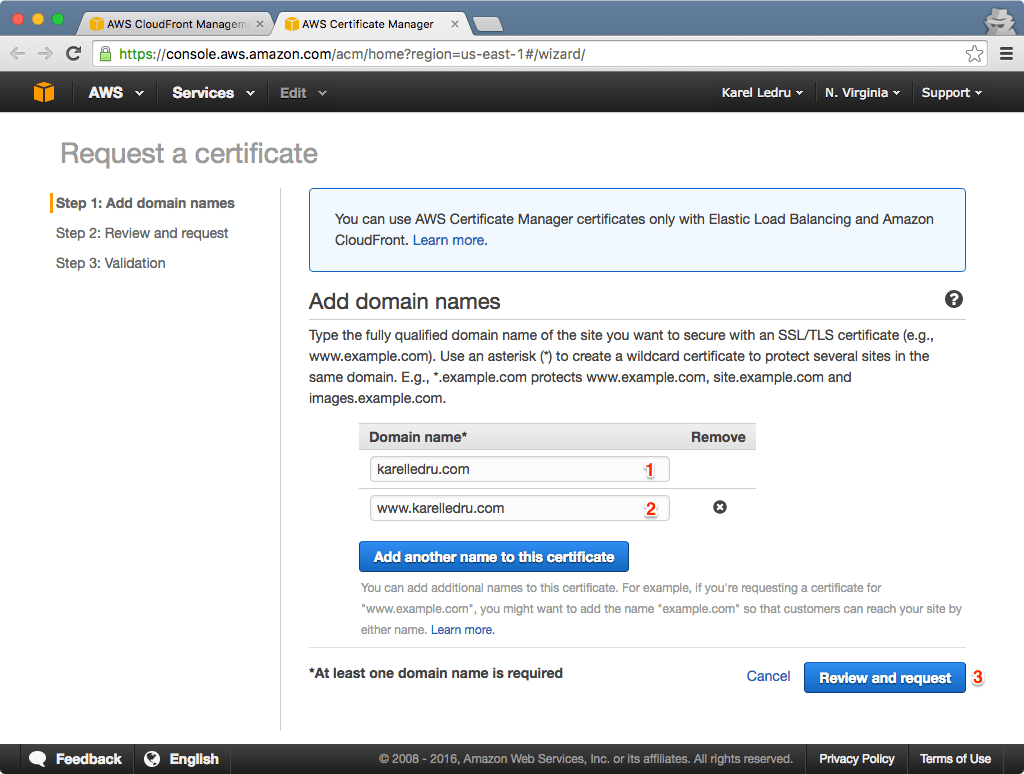
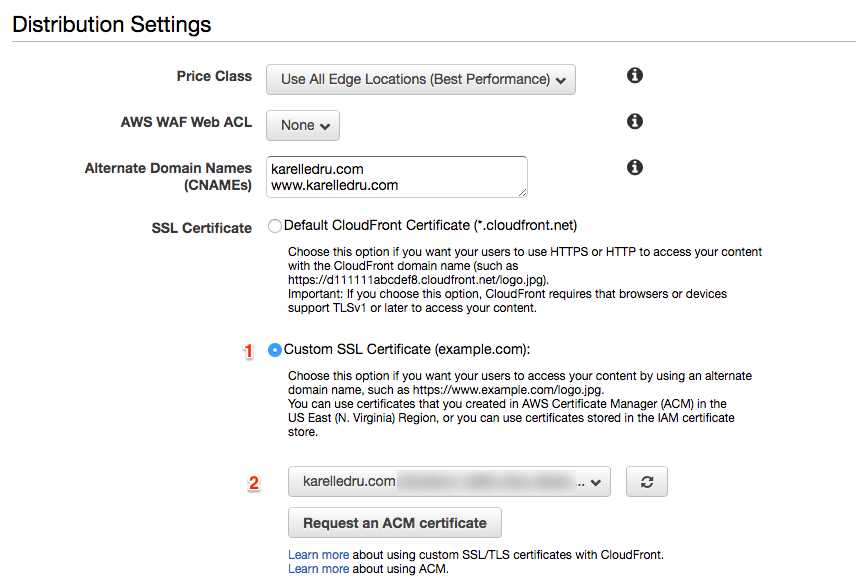
Note that I added the www.karelledru.com domain too because I want the certificate to work for both the TLD and the www subdomain. After creating the request, you will receive one email per domain to approve the request. Once you have approved the request for each domain name, the certificate will be issued and you can go back to your CloudFront Distribution Settings and change the SSL certificate to use our newly created one:
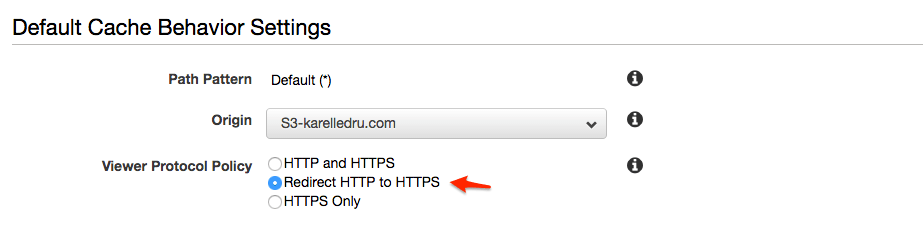
The last step would be to make sure you have the Viewer Protocol Policy set to "Redirect HTTP to HTTPS". You can do that under the Behaviours tab, edit the existing behaviour and change the option:
This might take couple minutes for CloudFront to apply the changes, you can monitor the status in the distributions list.
Create a limited user access with IAM
This step is optional but highly recommended. You could use your account access and private keys with Poltergeist but if they get exposed for some reason, you are screwed because they give access to all your Amazon resources. To avoid that, we will create a user that has access only to the S3 bucket and CloudFront disctribution. This isn't perfect though, Amazon doesn't offer a way to permission just a specific CloudFront distribution. It means the user will have access to all your CloudFront distributions but it is beter than have the keys to your Amazon kingdom.
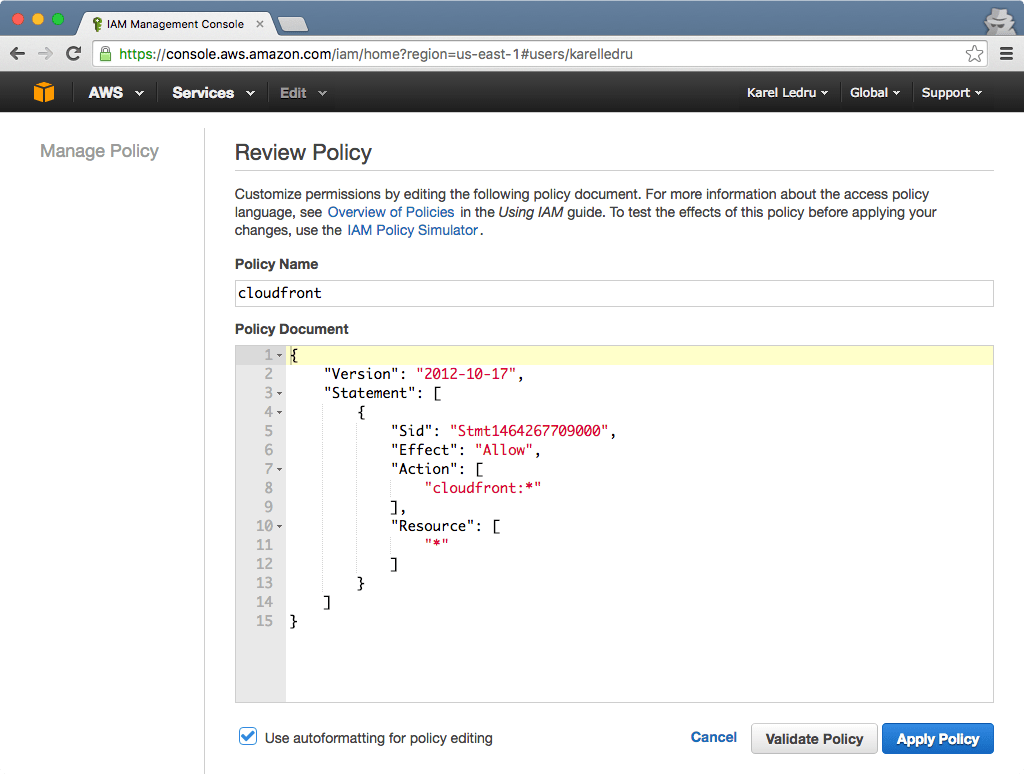
Go to the Users section of IAM, and click "Create New Users" and add a username, for consistency you can stick with karelledrucom like your bucket name. Once created, make sure you save the access and private keys, you can't get them back. Click on your newly created User and go to the "Permissions" tab. Under the "Inline Policies", create a new one for CloudFront:
{
"Version": "2012-10-17",
"Statement": [
  {
    "Sid": "Stmt1464267709000",
    "Effect": "Allow",
    "Action": [
      "cloudfront:*"
    ],
    "Resource": [
      "*"
    ]
  }
]
}
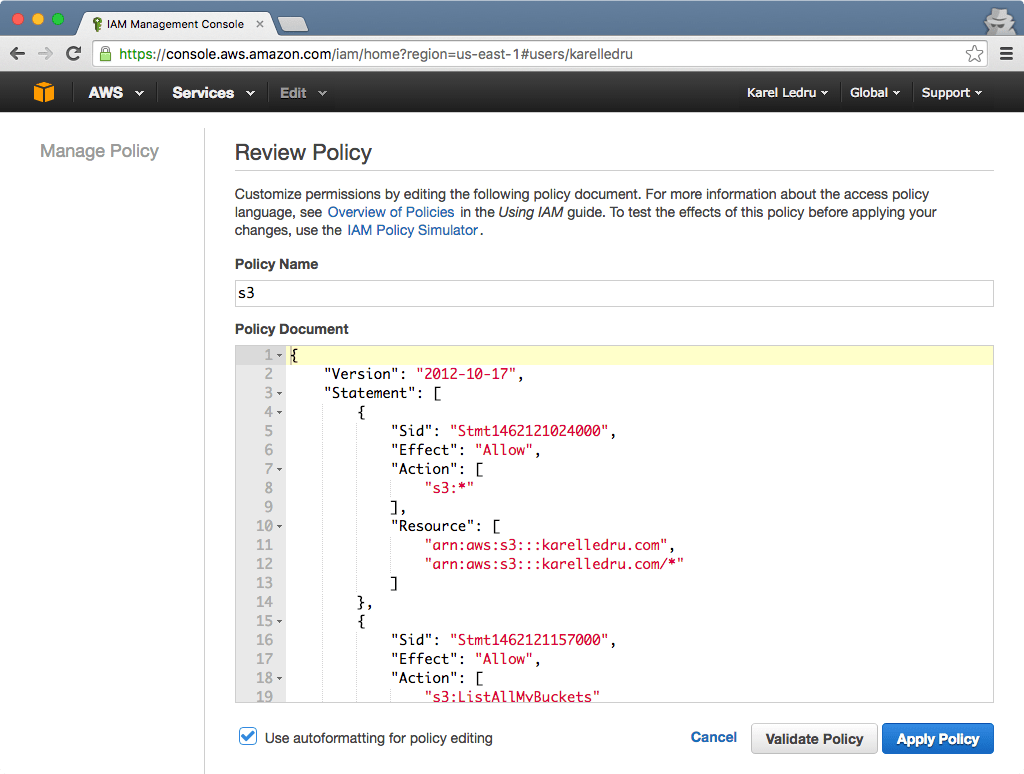
Repeat the above step for S3, this time replace the karelledru.com part with the S3 bucket you created at the beginning of this post:
{
"Version": "2012-10-17",
"Statement": [
  {
    "Sid": "Stmt1462121024000",
    "Effect": "Allow",
    "Action": [
      "s3:*"
    ],
    "Resource": [
      "arn:aws:s3:::karelledru.com",
      "arn:aws:s3:::karelledru.com/*"
    ]
  },
  {
    "Sid": "Stmt1462121157000",
    "Effect": "Allow",
    "Action": [
        "s3:ListAllMyBuckets"
    ],
    "Resource": [
      "arn:aws:s3:::*"
    ]
  }
]
}
You are done, this user has access to all it needs to deploy a Poltergeist site. You can use his access and private keys pair.
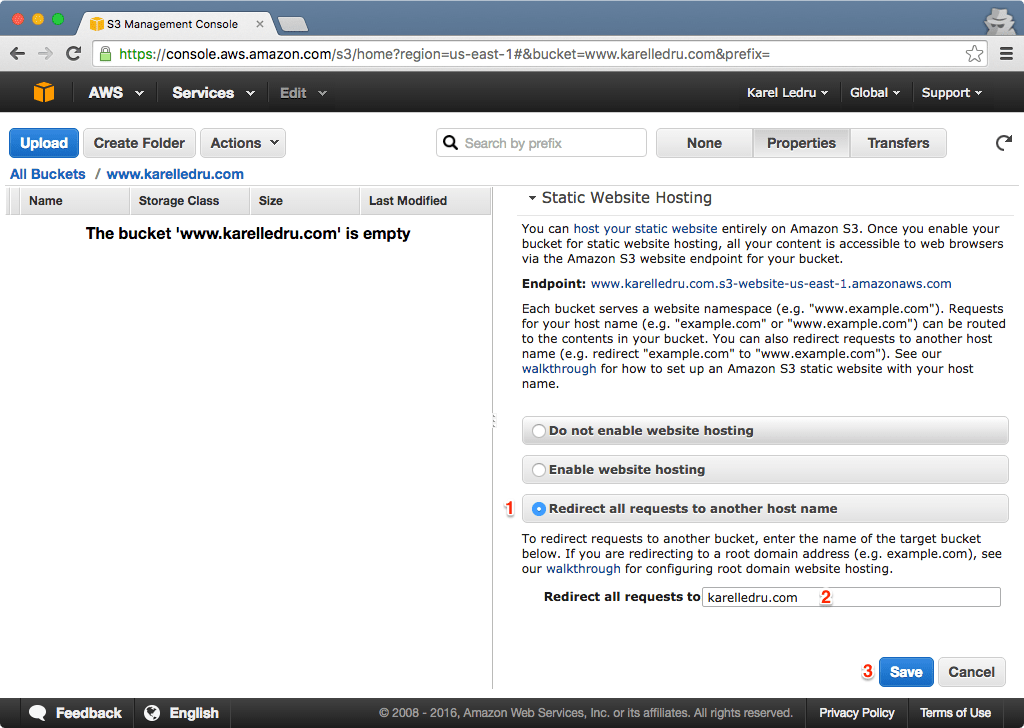
Redirect www. to our main site
A relic of the web is the www., when my grandma will type www.karelledru.com, I want her to make it safe to karelledru.com. First let's create another S3 bucket www.karelledru.com, the only difference is that you will redirect the traffic like so:
If didn't enable HTTPS for your main domain, skip this step. If you enabled SSL, you might want to also redirect https://www.karelledru.com, but at the moment since S3 websites don't support HTTPS, it fails with an error "This site can't be reached". To fix that we will simply create another CloudFront distribution:
- Origin Domain Name: Use the eebsite endpoint for your S3 bucket of the
www.*bucket, like we did previously for the TLD. - Viewer Protocol Policy: you can select
Redirect HTTP to HTTPSeven though it matters little. - Default Root Object: still is
index.html. - Alternate Domain Names: set it to
www.karelledru.com. - SSL Certificate: you can reuse the same SSL Certificate we created previously.
Now simply go to Route53 and set a A record for the www subdomain. Point it to the website bucket if you don't have SSL, or to the CloudFront distribution otherwise. Wait couple minutes, you are all set!
Conclusion
With all we've seen, you have all you need to configure Poltergeist for deployment:
- A S3 bucket and its region code
- An AWS access and private key pair
- A CloudFront distribution ID
- A CloudFront endpoint you can use for your
PRODUCTION_ASSET_URL